Main Back-up Battery Replacement

The NAPCO Security System has a 12-Volt 4-, 5- or 7-amp hour rechargeable back up battery. When the battery voltage drops below normal, a low-battery signal is displayed on the keypad. For GEMINI alarm system panels, an ‘E-02’ will be displayed. For MAGNUM ALERT alarm system panels, a number ‘2’, along with the green, yellow and red lights blinking, will be displayed. At that time, the battery may need to be replaced. Batteries can be ordered and shipped to your home by calling All Island Security at 1-516-747-0233.

Alarm system back up battery replacement
Figure 1
Alarm system back up battery replacement
Figure 2

To replace the battery, locate the alarm system Control Panel (not the keypad) usually in the basement or in a 1st floor closet. See Figure 1 above. Open the door by removing any screws around the lip of the panel door. Unplug the existing battery and recycle. Replace the new battery making sure to plug the RED WIRE to the RED TERMINAL and the BLACK WIRE to the BLACK TERMINAL. BE CAREFUL NOT TO REVERSE THE POLARITY AS IT MAY DAMAGE THE CONTROL PANEL. See Figure 2 above. Close the panel door and replace the screws.

When completed, go the keypad and press the ‘RESET’ button. On the newer version Gemini panels (Version V31G or greater, installed or upgraded after Jan 1, 2021), you must enter your user code and then press ‘RESET’.

To ‘RESET’ MAGNUM ALERT panels, PRESS AND HOLD the 9 key for 3 seconds.

Trans LP Wireless Transmitter Battery Replacement

The Napco GEM-TRANSLP wireless transmitter is powered by a 3-Volt Type CR2032 lithium battery. When the battery voltage drops below normal, a low-battery signal; E-05-(followed by the 2-digit zone number of the transmitter) will display sequentially on the keypad. At that time, the battery needs to be replaced. Batteries can be ordered and shipped to your home by calling All Island Security at 1-516-747-0233.

Napco Gemini TransLP Wireless Transmitter Battery Replacement
Figure 1
Napco Gemini TransLP Wireless Transmitter Battery Replacement
Figure 2
Napco Gemini TransLP Wireless Transmitter Battery Replacement
Figure 3

To replace the battery, remove the cover by inserting a small screwdriver into the slots on the sides of the transmitter, twisting while applying upward pressure. Repeat on opposite sides if necessary. See Figure 1 above. Separate the cover from the base. See Figure 2 above.

IMPORTANT: BEFORE REMOVING THE OLD BATTERY, OBSERVE THE BATTERY AND NOTE THE 2 BRASS PRONGS AND THEIR POSITION ON TOP OR BELOW THE BATTERY. The battery must be replaced in the same position!

REMOVE THE OLD BATTERY: CAUTION : Place your thumb on the battery with some pressure on it and hold it there while inserting a small screwdriver to pry out the battery (in order to prevent the battery holder from separating from the board).

INSERT THE NEW BATTERY: Observe polarity with the positive (+) side facing up. Slide the battery under the two brass prongs (on older versions) and press into the battery holder OR place the battery on top of the 2 brass prongs (on newer versions) and press into the battery holder. See Figure 3 above.

Replace the cover by snapping it back onto the base. It can only go on in one direction. Do not force it closed. If it doesn’t close, try reversing the cover and snapping it back in place.

When completed, go the keypad and press the ‘RESET’ button. On the newer version Gemini panels (Version V31G or greater, installed or upgraded after Jan 1, 2021) you must enter your user code and then press ‘RESET’.

Trans 2 Wireless Transmitter Battery Replacement

The Napco GEM-TRANS2 wireless transmitter is powered by a 3-Volt Type CR123 lithium battery. When the battery voltage drops below normal, a low-battery signal; E-05-(followed by the 2 digit zone number of the transmitter) will display sequentially on the keypad. At that time, the battery needs to be replaced. Batteries can be ordered and shipped to your home by calling All Island Security at 1-516-747-0233.

Napco Gemini Trans2 Wireless Transmitter Battery Replacement
Figure 1
Napco Gemini Trans2 Wireless Transmitter Battery Replacement
Figure 2
Napco Gemini Trans2 Wireless Transmitter Battery Replacement
Figure 3

To replace the battery, remove the cover by inserting a small screwdriver into the slot at the bottom of the alarm system transmitter and twisting while applying upward pressure. See Figure 1 above. The cover will open toward the ‘hinge’ on the opposite side. See Figure 2 above.

Remove the old battery. Insert the new battery. Observe polarity. Insert the battery with the positive (+) terminal toward the terminal block. See Figure 3 above.

Replace the cover by placing it on the ‘hinge’ first and then closing it and snapping it back onto the base. See Figure 2 above.

When completed, go the keypad and press the ‘RESET’ button. On the newer version Gemini panels (Version V31G or greater, installed or upgraded after Jan 1, 2021), you must enter your user code and then press ‘RESET’.

Wireless Motion Sensor Battery Replacement

The Napco GEM-PIRPET wireless Motion Sensor is powered by 2 (two) 3-Volt Type CR123 lithium batteries. When the battery voltage drops below normal, a low-battery signal; E-05-(followed by the 2-digit zone number of the Motion Sensor) will display sequentially on the keypad. At that time, the batteries need to be replaced. Batteries can be ordered and shipped to your home by calling All Island Security at 1-516-747-0233.

Wireless motion sensor battery replacement
Figure 1
Wireless motion sensor battery replacement
Figure 2
Wireless motion sensor battery replacement
Figure 3

To replace the batteries, insert a flat head screwdriver in the center of the base between the seams and push and twist at the same time to open the cover. See Figure 1 above. The cover will open toward the ‘hinge’ on the opposite side. See Figure 2 above.

Remove the old batteries. The battery holder is very tight to the battery, and the batteries may have to be pried out with a flat head screwdriver. Be careful not to damage the unit. Insert the new batteries. Observe polarity. Insert the battery with the positive (+) terminal toward the right side of the Motion Sensor. See Figure 3 above. The battery holder is very tight to the battery and you may have to apply a good amount of pressure to insert the battery inside the blue battery holder as well as pushing it down inside the holder.

Replace the cover by placing it on the ‘hinge’ first and then closing it and snapping it back onto the base. See Figure 2 above.

When completed, go the keypad and press the ‘RESET’ button. On the newer version Gemini panels (Version V31G or greater, installed or upgraded after Jan 1, 2021), you must enter your user code and then press ‘RESET’.

Wireless Keyfob Battery Replacement

The Napco GEM-KEYF Keyfob wireless transmitter is powered by a 3-Volt Type CR2032 lithium battery. When the battery voltage drops below normal, the LED will begin flashing. In addition, a low-battery signal; E-18-(followed by the 2-digit number of the keyfob) will display sequentially on the keypad. At that time, the battery needs to be replaced. Batteries can be ordered and shipped to your home by calling All Island Security at 1-516-747-0233.

Napco Gemini Wireless Keyfob Battery Replacement
Figure 1
Napco Gemini Wireless Keyfob Battery Replacement
Figure 2
Napco Gemini Wireless Keyfob Battery Replacement
Figure 3
Napco Gemini Wireless Keyfob Battery Replacement
Figure 4

To replace the battery, remove the key ring from the key ring loop. Carefully insert a small screwdriver into the notch located in the bottom right corner of the Keyfob (near the key ring loop) and gently twist. See Figure 1. Lift off the top cover. With the bottom half of the Keyfob facing upwards, carefully remove the circuit board with the screwdriver or a paper clip. See Figure 2 and Figure 3 above. On the bottom side of the circuit board, push the battery out of its metal holder with a small screwdriver or paper clip. See Figure 4 above.

Insert the battery with the positive (+) side up by sliding it into the metal bracket.

Reassemble the case by first placing the circuit board, battery side down, into the Keyfob base. See Figure 3 above. Place the top of the Keyfob (with the rubber button/gasket in place) on the Keyfob base and press to snap closed.

When completed, test the Keyfob operation.

Wireless Smoke Detector Battery Replacement

The Napco GEM-SMK wireless smoke detector is powered with 2 different battery types. A 3-Volt Type CR123 lithium battery AND a 9-Volt alkaline battery. When the battery voltage drops below normal, a low-battery signal; E-05-(followed by the 2-digit zone number of the Smoke Detector) will display sequentially on the keypad. At that time, the battery needs to be replaced. Batteries can be ordered and shipped to your home by calling All Island Security at 1-516-747-0233.

Napco Gemini Wireless Smoke Detector Battery Replacement
Figure 1
Napco Gemini Wireless Smoke Detector Battery Replacement
Figure 2
Napco Gemini Wireless Smoke Detector Battery Replacement
Figure 3
Figure 4
Figure 4

To replace the batteries, first remove the smoke detector from the base by turning it counterclockwise.

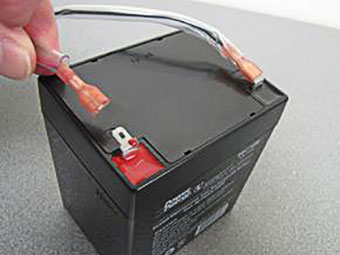
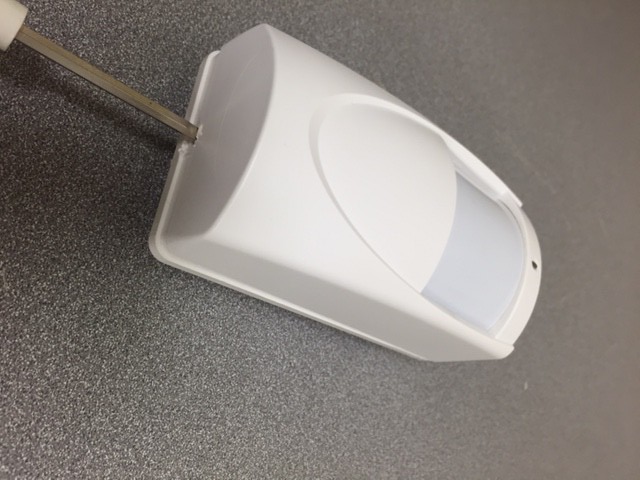
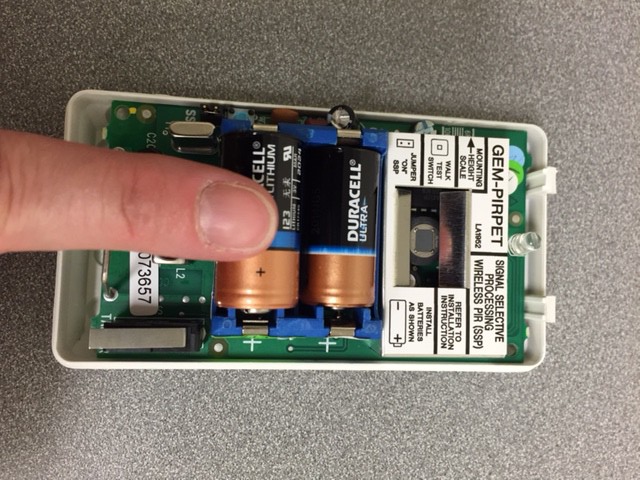
Open the 9-Volt battery cover with a Phillips head screwdriver. See Figure 1 above. Replace with a new 9-Volt Alkaline battery. Next, open the 3-Volt lithium battery cover by prying it with a regular screwdriver. See Figure 2 above. Remove the battery by pulling up on the (+) positive end first. When installing the new 3-Volt lithium battery, MAKE SURE TO INSTALL THE NEGATIVE END FIRST (See Figure 3 above), then push down on the positive end. Replace both covers.

Put the unit back onto the base by turning clockwise.

IMPORTANT: The smoke detector must be triggered in order to complete the process. BE SURE TO CALL US AT 516-747-0233 DURING NORMAL BUSINESS HOURS TO TAKE YOUR ACCOUNT OFF-LINE PRIOR TO TRIGGERING THE SMOKE DETECTOR.
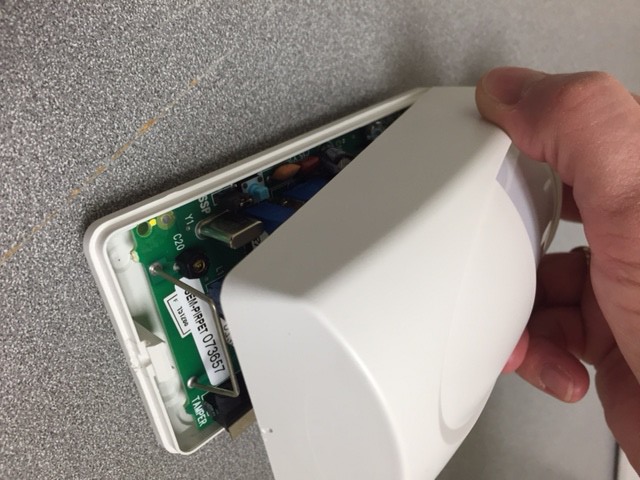
 After your system is off-line, press and hold the oval button on the face of the smoke detector to trigger the alarm. See Figure 4 above. To silence the alarm, enter your code and then press the ENTER key. You must repeat by entering your code and pressing the ENTER key for a second time in order to silence the alarm.

When completed, go the keypad and press the ‘RESET’ button. On the newer version Gemini panels (Version V31G or greater, installed or upgraded after Jan 1, 2021), you must enter your user code and then press ‘RESET’.

Wireless Audio Glass Break Battery Replacement

The Napco GEM-GB wireless audio glass break detector is powered by 2 (two) 3-Volt Type CR123 lithium batteries. When the battery voltage drops below normal, a low-battery signal; E-05-(followed by the 2-digit zone number of the Audio Glass Break Sensor) will display sequentially on the keypad. At that time, the battery needs to be replaced. Batteries can be ordered and shipped to your home by calling All Island Security at 1-516-747-0233.

Napco Gemini Wireless Audio Glass Break Sensor Battery Replacement
Figure 1
Napco Gemini Wireless Audio Glass Break Sensor Battery Replacement
Figure 2
Napco Gemini Wireless Audio Glass Break Sensor Battery Replacement
Figure 3

To replace the batteries, first remove the glass break detector from the base. See Figure 1. Pressure may need to be applied to the top and bottom of the base in order for the tabs on the cover to clear the holding groove on the base. See Figure 2 above.

Remove the batteries by pulling up on the (+) positive end first. When installing the new 3-Volt lithium batteries, MAKE SURE TO INSTALL THE NEGATIVE END FIRST. Then push down on the positive end. Replace the cover. See Figure 3 above.

When completed, go the keypad and press the ‘RESET’ button. On the newer version Gemini panels (Version V31G or greater, installed or upgraded after Jan 1, 2021), you must enter your user code and then press ‘RESET’.